Configure SIP Trunk/Routes in Asterisk
We can connect Asteriks FreePBX system with Cisco Call Manager (CCM) through SIP (Session Intention Protocol) trunk. First of all your CCM should support SIP trunks. The latest versions CCM 4.1 and higher versions are now support for sip trunks.
First i will explain how to configure SIP trunk in FreePBX step by step.
1. Login to FreePBX administration application and select Setup tab > Trunks > Add SIP Trunk.
 2. Then provide following specified fields values and others keep as their default values. I will assume that CCM IP as 192.168.5.12
General Settings
Dial Rules: Your dial rule pattern here.
It means you can dial only three digit numbers starting from 1 as 100, 101 etc
Outgoing Settings
Ex: InterOffice
deny=all
allow=g729&alaw
type=friend
host=192.168.5.12
qualify=yes
context=from-internal
Those options mean,
It is important to use "qualify" in sip.conf since Call Manager does not support registration for SIP trunks.
USER Context : User context name here
Ex : InterOffice-In
USER Details: User details here.
Ex:
context=from-internal
host=192.168.5.12
type=user
Route Name: Your route name here
Ex:InterOffice-CCM
Dial Pattern: Your dial pattern here
Ex: 1xx
Trunk Sequence: Your trunk sequence here.
Ex: SIP/InterOffice

5. Now we have to configure SIP trunk from CCM to connect with Asterisk FreePBX. I will assume that asterisk server IP as 172.25.103.52
Configure SIP Trunk/Routes in CCM
1. Open up the CallManager Administration web page. 2. Since a SIP trunk requires MTP, make sure you have one:
- Service -> Media Resource -> Media Termination Point
- Normally your CallManager server should appear there if you do an empty query
- if not, go to the CallManager Serviceabilty web page, and activate the Cisco IP Voice Media Streaming App service
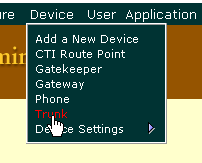
3. Select Device->Trunk from the menu.

4. Select the "Add a New Trunk" link from the upper right hand corner of the "Find and List Trunks" page.

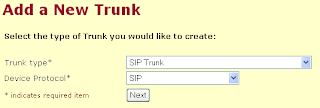
5. Select "SIP Trunk" as the "Trunk type" and "SIP" as the "Device Protocol". Click on the "Next" button.

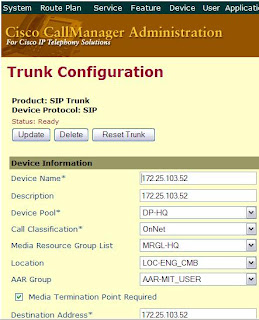
6. Enter a name in the "Device Name". Valid characters are letters, numbers, dashes, dots (periods), and underscores. The device name is only used internally in Call Manager so it can be anything you want.
7. Enter a description in the "Description" field.
8. Select a device pool.
9. Enter the IP address of your Asterisk server in the "Destination Address" field.

10. Select "UDP" as the "Outgoing Transport Type".
11. Modify any other settings as needed for your ((CiscoCallManager|CallManager) installation.


12. Click on the "Insert" button.
13. Add route pattern from CCM Ex: 409


Now you should be able to make a call from CISCO phones registered with CCM to phone/extensions registered with Asterisk FreePBX vise versa.
Make sure that both your dialing pattern meet the extention range.


3 comments:
A short and sweet article...
Hi
I followed your directions but I'm having problems calling extension on the cisco cme4.1. I'm using the cli version of call manager do you have the instruction for creating a sip trunk on the cme4.1 in cli?
Thanks again
Hi my email address is
mikeleepit@gmail.com
Post a Comment